
Switch | Description |
/a | Creates an item with the specified file as an attachment. Example: "C:\Program Files\Microsoft Office\Office11\Outlook.exe" /a "C:\My Documents\labels.doc" If no item type is specified, IPM.Note is assumed. Cannot be used with message classes that aren't based on Outlook. |
/altvba otmfilename | Opens the VBA program specified in otmfilename, rather than %appdata%\Microsoft\Outlook\VbaProject.OTM. |
/autorun macroname | Opens Outlook and immediately runs the macro specified in macroname. |
/c messageclass | Creates a new item of the specified message class (Outlook forms or any other valid MAPI form). Examples: /c ipm.activity creates a Journal entry /c ipm.appointment creates an appointment /c ipm.contact creates a contact /c ipm.note creates an e-mail message /c ipm.stickynote creates a note /c ipm.task creates a task |
/checkclient | Prompts for the default manager of e-mail, news, and contacts. |
/cleanclientrules | Starts Outlook and deletes client-based rules. |
/cleandmrecords | Deletes the logging records saved when a manager or a delegate declines a meeting. |
/cleanfinders | Removes Search Folders from the Microsoft Exchange server store. |
/cleanfreebusy | Clears and regenerates free/busy information. This switch can only be used when you are able to connect to your Microsoft Exchange server. |
/cleanprofile | Removes invalid profile keys and recreates default registry keys where applicable. |
/cleanpst | |
/cleanreminders | Clears and regenerates reminders. |
/cleanrules | Starts Outlook and deletes client- and server-based rules. |
/cleanschedplus | Deletes all Schedule+ data (free/busy, permissions, and .cal file) from the server and enables the free/busy information from the Outlook Calendar to be used and viewed by all Schedule+ 1.0 users. |
/cleanserverrules | Starts Outlook and deletes server-based rules. |
/cleansniff | Deletes duplicate reminder messages. |
/cleansubscriptions | Deletes the subscription messages and properties for subscription features. |
/cleanviews | Restores default views. All custom views you created are lost. |
/designer | Starts Outlook without figuring out if Outlook should be the default client in the first run. |
/embedding | Opens the specified message file (.msg) as an OLE embedding. Also used without command-line parameters for standard OLE co-create. |
/explorer | Opens the new window in "explorer" mode (link bar on). |
/f msgfilename | Opens the specified message file (.msg) or Microsoft Office saved search (.oss). |
/firstrun | Starts Outlook as if it were run for the first time. |
/folder | Opens a new window in "folder" mode (Navigation Pane off). |
/hol holfilename | Opens the specified .hol file. |
/ical icsfilename | Opens the specified .ics file. |
/importprf prffilename | Launches Outlook and opens/imports the defined MAPI profile (*.prf). If Outlook is already open, queues the profile to be imported on the next clean launch. |
/l olkfilename | Opens the specified .olk file. |
/launchtraininghelp assetid | Opens a Help window with the Help topic specified in assetid. |
/m emailname | Provides a way for the user to add an e-mail name to the item. Only works in conjunction with the /c command-line parameter. Example: Outlook.exe /c ipm.note /m emailname |
/nocustomize | Starts Outlook without loading outcmd.dat (customized toolbars) and *.fav file. |
/noextensions | Starts Outlook with extensions turned off, but listed in the Add-In Manager. |
/nopollmail | Starts Outlook without checking mail at startup. |
/nopreview | Starts Outlook with the Reading Pane off and removes the option from the View menu. |
/p msgfilename | Prints the specified message (.msg). Does not work with HTML. |
/profile profilename | Loads the specified profile. If your profile name contains a space, enclose the profile name in quotation marks ("). |
/profiles | Opens the Choose Profile dialog box regardless of the Options setting on the Tools menu. |
/recycle | Starts Outlook using an existing Outlook window, if one exists. Used in combination with /explorer or /folder. |
/resetfoldernames | Resets default folder names (such as Inbox or Sent Items) to default names in the current Office user interface language. For example, if you first connect to your mailbox Outlook using a Russian user interface, the Russian default folder names cannot be renamed. To change the default folder names to another language such as Japanese or English, you can use this switch to reset the default folder names after changing the user interface language or installing a different language version of Outlook. |
/resetfolders | Restores missing folders for the default delivery location. |
/resetnavpane | Clears and regenerates the Navigation Pane for the current profile. |
/rpcdiag | Opens Outlook and displays the remote procedure call (RPC) connection status dialog. |
/s filename | Loads the specified shortcuts file (.fav). |
/safe | Starts Outlook without extensions, Reading Pane, or toolbar customization. |
/safe:1 | Starts Outlook with the |
/safe:2 | Starts Outlook without checking mail at startup. |
/safe:3 | Starts Outlook with extensions turned off, but listed in the Add-In Manager. |
/safe:4 | Starts Outlook without loading Outcmd.dat (customized toolbars) and *.fav file. |
/select foldername | Starts Outlook and opens the specified folder in a new window. For example, to open Outlook and display the default calendar use: "c:\Program Files\Microsoft Office\Office11\Outlook.exe" /select outlook:calendar |
/sniff | Starts Outlook and forces a detection of new meeting requests in the Inbox, and then adds them to the calendar. |
/t oftfilename | Opens the specified .oft file. |
/v vcffilename | Opens the specified .vcf file. |
/vcal vcsfilename | Opens the specified .vcs file. |
/x xnkfilename | Opens the specified .xnk file. |
Tuesday, January 11, 2011
Outlook Commandline Switches


Saturday, January 1, 2011
Exchange 2007 Cluster Continuous Replication (CCR) - Draft Version
Implementation CCR for Exchange 2007
Parts of the Documentation:
- Introduction to the Lab Setup
- Brief on installation of Domain Controller
- Installing HUB/CAS/UM role prior to Clustered Mailbox implementation
- Creating Majority Node Set(MNS Quorum, File Share witness) and setting up the permissions
- Installation and configuration of both the node on Cluster server
- Installation of Mailbox server role on both the nodes.
- Creating Multiple/Bulk Exchange users from Script.

IIS COM+ and WWW services are also prerequisites of exchange 2007, we dont need them for every server role.
Installation of Domain Controller
Installation of Domain Controller
Install 2K8 SP2.
Run “DCPROMO”
Setup DNS for the domain
Once our Dcpromo wizard is complete, restart the domain controller.
Install Win2K3 SP2 on other two nodes and add them as member servers Node1 and Node2.
Friends here we are going to install Exchange 2007 on Cluster Continuous Replication (CCR). So once we have decided that we want to implement CCR for our Exchange Organization we must install other roles prior to Mailbox role in our domain. So I am going to start steps by step installation of CCR from scratch.
Installing HUB/CAS/UM role prior to Clustered Mailbox implementation
Friends here we are going to install Exchange 2007 on Cluster Continuous Replication (CCR). So once we have decided that we want to implement CCR for our Exchange Organization we must install other roles prior to Mailbox role in our domain. So I am going to start steps by step installation of CCR from scratch.
Installing HUB/CAS/UM role prior to Clustered Mailbox implementation
It’s important that we have HUB\CAS roles in-place in our domain before we start installing Mailbox role on cluster nodes.
So let’s start with the installation of HUB\CAS\UM server roles.
We need to install our server for Exchange 2007 with prerequisites mentioned above.
As you will proceed you will see I have tried to capture every possible move in screenshots. So there is very less left for write-up. Particularly, if you are looking for a step-by-step process. Here are the steps you need to follow.
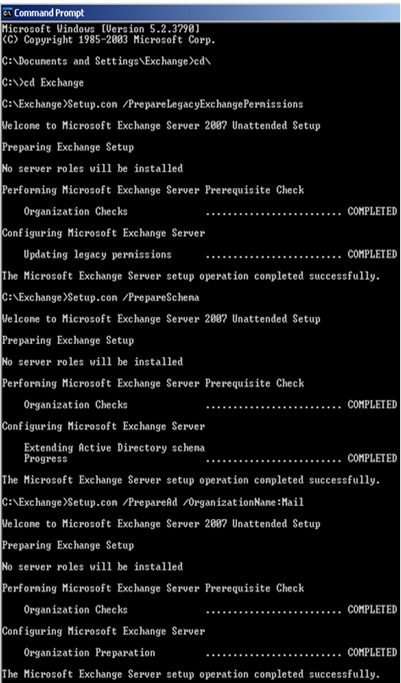
Please run these commands from command prompt as shown below:




Select the option Cluster Continuous Replication and assign a new IP for your Mailbox server.
(This IP should be different then other mailbox roles you have implemented)


Enter this command: .\CreateUsersFromCSV.ps1 this will ask us to browse to the location where we have kept out CSV file. just navigate to the folder, select the csv file and click open.
As soon as we will clicopen it will start creating users and within a min or so more than 300 Lab users will be created under a New OU called "Exchange Users"
Here we are done with the Implementation of CCR on Exchange 2007 in a Test Environment.
So let’s start with the installation of HUB\CAS\UM server roles.
We need to install our server for Exchange 2007 with prerequisites mentioned above.
Create one login with Domain Admin, Enterprise Admin and Schema Admin permissions.
We need these permissions to prepare schema and AD Preperation.
As you will proceed you will see I have tried to capture every possible move in screenshots. So there is very less left for write-up. Particularly, if you are looking for a step-by-step process. Here are the steps you need to follow.
Please run these commands from command prompt as shown below:
After complition of Ad preperation, we can start with the installation of our first Exchange server.
If you have sucessfully installed all prerequisites you will see all 3 steps will grey out.
If you have sucessfully installed all prerequisites you will see all 3 steps will grey out.
Don't worry if you are not sure, once you will start the installation it will run a prerequisites test for you, So just click on Step4 of the wizard to start installation of exchange 2007.

Click next on the introduction screen to move ahead.
Click I Agree to accept terms and conditions.
Click Yes for reporting, it will help you in some system failure for known solutions from Microsoft.
We need to customize our selection as we are going to install only CAS/HUB and UM server roles.
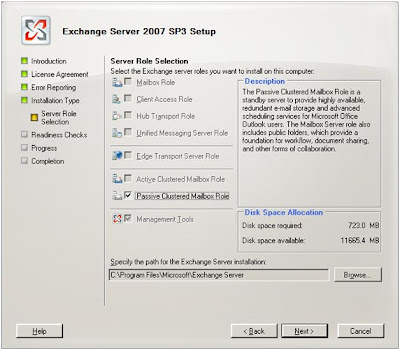
Click to server roles which we need to install, in our case will select CAS/HUB and UM.

Once we see setup has completed with no errors, click Finish and update the server before you reboot.

Once its rebooted our CAS/HUB and UM server is ready. Now we need to step ahead to configure our Mailbox role on CCR Cluster. but before we do that we must take care of "MNS" & Quorum.
Setting up "Majority Node Set" (MNS) Folder with correct permission on HUB Transport.
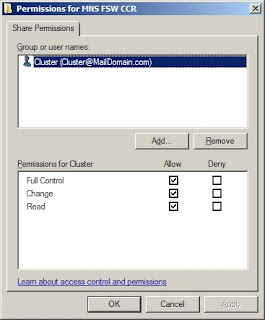
This Folder will act as an additional vote to the cluster as its not on any of the nodes from Cluster, to determine the status of the cluster in a 2Node MNS quorum cluster deployment. Its necessary in order to make use of the CCR functionality in Exchange Server 2007.
Therefore we will create a folder on HUB Transport server and also set permission for Cluster admin account. Before we start with the installation of Mailbox server role, we need to configure cluster services on both nodes. We must configure cluster nodes before we install exchange server roles on it.
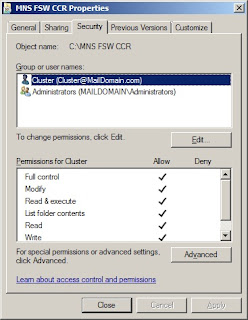
Configuration of CCR.. (Node1)
Initiate Cluster Administrator Wizard.
This Folder will act as an additional vote to the cluster as its not on any of the nodes from Cluster, to determine the status of the cluster in a 2Node MNS quorum cluster deployment. Its necessary in order to make use of the CCR functionality in Exchange Server 2007.
Therefore we will create a folder on HUB Transport server and also set permission for Cluster admin account. Before we start with the installation of Mailbox server role, we need to configure cluster services on both nodes. We must configure cluster nodes before we install exchange server roles on it.


Configuration of CCR.. (Node1)
Initiate Cluster Administrator Wizard.
We will select Create New Cluster here
Click Next to startup with New Server Cluster Wizard.
Our Domain name should pop-up automatically if not its fine we can just select from dropdown menu under Domain. Also we will assign a name to this cluster which we are building up.
Add 1st node on which we are going to install Clustering services.
Click next and dont worry about these 2 warning, we can ignore them.
Assign one new IP for Cluster Managment service. (This IP will be different from both the nodes.)
Assign a dedicated Cluster Service Account with Domain Admin rights which can manage our Cluster.
Click on Quorum to configure Majority Node Set
Select Majority Node Set from Dropdown list.
Click next which once get complete we will be at final screen of our Node1 Cluster configuration.
Click Finish and we succssfully created our Cluster server.
Now we can open Cluster Administrator either from Administrative tools or CluAdmin from Run command.
Here we can see we are ready with our Cluster Server but with no fault tolerance, and to do so we need to add another node i.e. Node2 to our cluster server.
Adding Node2 to our Cluster:
Right click on 1st Node and selec Node to add second node to our cluster.
Browse for Computer name and select second node.
Click add to add CCRNode2 into selected computers of our cluster and click Next.
We have to provide Cluster credential so that we can add more nodes to any running Cluster.
Review the summary of our selection and if everything is as per our expectation click Next.
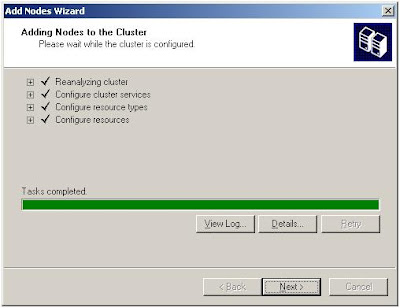
Click next to reach final screen.

Click Finish to finish the wizard.

We can start Cluster Administrator to verify our 2 Nodes in cluster for fault taulerance.
Once we are done with the Node configuration, testing of failovers from first node to second.
We are ready to install mailbox server role on both the nodes.
Installation of Mailbox server role:
(Active/Passive)
Installation procedure for Active node and for the passive node is almost similiar, its just that we have to select Active Clustered Mailbox Rule on the first one and Passive Clustered Mailbox role on the second one.
Lets begin with Active node first. Installation is almost similar till 4 to 5 screens in the wizard.

Just walk through from these options as we did earlier.


Same window will apear when will install Passive node, here we have to select the Passive Clustered Maibox Role.

Select the option Cluster Continuous Replication and assign a new IP for your Mailbox server.
(This IP should be different then other mailbox roles you have implemented)


Reboot you mailbox server alternately to check the functionality of your Cluster.
Lets Create Multiple/Bulk users from powershell command using script and csv file.
Open Powershell console Enter this command: .\CreateUsersFromCSV.ps1 this will ask us to browse to the location where we have kept out CSV file. just navigate to the folder, select the csv file and click open.
As soon as we will clicopen it will start creating users and within a min or so more than 300 Lab users will be created under a New OU called "Exchange Users"
Here we are done with the Implementation of CCR on Exchange 2007 in a Test Environment.
Subscribe to:
Posts (Atom)
Popular Posts
-
 The Exchange 2007 transport pipeline consists of the following components and processes: SMTP Receive When an Email is received at the Ed...
 -
 Implementation CCR for Exchange 2007 Parts of the Documentation: Introduction to the Lab Setup Brief on installation of Domain Controller ...
 -
 Lets assume a Mail is send by a user to a recipient. As soon as an Outlook users sends an email, the Microsoft Exchange Mail Submission se...
 -
Experience with WIPRO ( Infotech Group) Guys I would like to share my experience with WIPRO when I was working for Gujarat Gas on franchi...
-
 EV 9.0.1 early release has been made available to partners which provides support to Outlook 2010 (screen shots attached). For EV 8 SP4, su...
 -
Pravin Sangwan 0 Hi Friends, I would like to know can we actually rename edb file in exchange 2007 and mount the database connecting to it?...
-
Hi Guys, I was facing this issue quite often which says, Nero 7014 Could not perform end of Disc -at- once . I googled it found that lot of...
-
 My First Exchange 2007 Installation on Windows 2003 SP2 64 Bits. It was back in March 2010, where I wanted to start learning Microsoft Exch...
 -
Switch Description /a Creates an item with the specified file as an attachment. Example: "C:\Program Files\Microsoft Office\Office11\...
